Tutorial
kneejerk is a library that accomplishes scoring/using your image data in two steps:
- Rapid scoring of your images via the Command Line Interface (CLI)
- Using the file generated by (1) transfer all of the images into a neat directory structure
- Leverage a tool like
kerasto do Data Science Magic
Let’s go through these now.
Example Project
If you want to download and follow along with a simple application of kneejerk, head to this repository, clone it locally, and pip install kneejerk.
After cloning, our project structure looks like
kneejerk_example
 |
 |--- images
 |      |
 |      |--- bart.jpg
 |      |--- bug_chasing.jpg
 |      |--- bug_fixing.jpg
 |      |
 |      |   ...
 |      |
 |      |---- wack.png
 |--- README.md
Scoring
Now we want to actually score our data.
To do this, we’ll leverage the kneejerk CLI that you got for free as a result of pip installing the library.
Doing this is as simple as typing kneejerk score and then populating the following options:
-i, the location of the directory containing your images, defaulted to wherever you calledkneejerkfrom-f, the name of the resulting.csv, defaulted tooutput.csv-o, the directory to dump the.csvfrom the last step. Also defaulted to wherever you called the tool-s, shuffle the order that images are served up. Choose between0/1, defaulted to0--min, the minimum accepted value you input when scoring, defaulted to0--max, the maximum accepted value you input when scoring, defaulted to1-l, limit the number of images to score, defaulted to all
On Our Data
So in our case, if we wanted to launch the tool from the root diectory of scratch, aimed at our images, and dropping a resulting .csv at the root of the project, we’d use the following:
$ kneejerk score -i images -o . -f example.csv -s 0
Which will immediately launch a matplotlib interface that waits for your keyed value for the image.
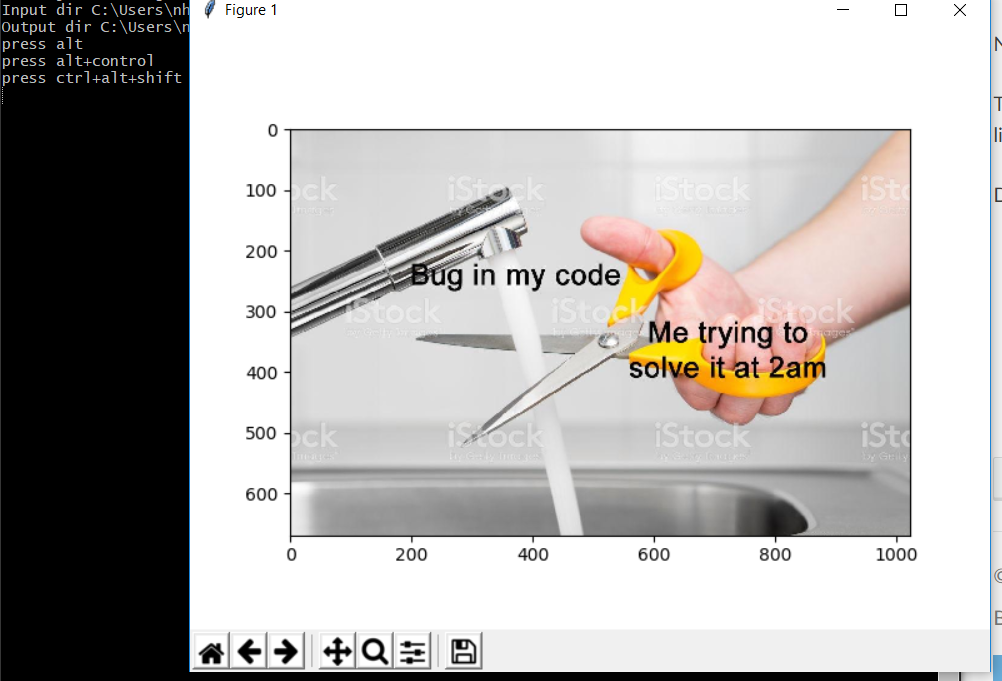
Pressing your value will immediately log your score, close the current image, and open the next. This repeats until you’ve gone through the whole input directory.
When this is finished, your project structure will now look like
kneejerk_example
 |
 |--- example.csv
 |--- images
 |      |
 |      |--- bart.jpg
 |      |--- bug_chasing.jpg
 |      |--- bug_fixing.jpg
 |      |
 |      |   ...
 |      |
 |      |---- wack.png
 |--- README.md
And if we keyed in 9 0 values followed by 9 1 values, we could inspect the resulting .csv to see that it’s of the form (filepath, score), like so (omitting my full firepath):
$ cat example.csv
kneejerk_workspace\images\bart.jpg,0
kneejerk_workspace\images\bug_chasing.jpg,0
kneejerk_workspace\images\bug_fixing.jpg,0
kneejerk_workspace\images\cool_cat.jpg,0
kneejerk_workspace\images\dating.jpg,0
kneejerk_workspace\images\debug.jpg,0
kneejerk_workspace\images\deep_learning.jpg,0
kneejerk_workspace\images\drake.jpg,0
kneejerk_workspace\images\garbage.png,0
kneejerk_workspace\images\harry.jpg,1
kneejerk_workspace\images\honest_work.png,1
kneejerk_workspace\images\keep_out.jpg,1
kneejerk_workspace\images\machine_learning.jpg,1
kneejerk_workspace\images\starbucks.jpg,1
kneejerk_workspace\images\stash.png,1
kneejerk_workspace\images\trying_to_sleep.jpg,1
kneejerk_workspace\images\version_control.png,1
kneejerk_workspace\images\wack.jpg,1
Transferring
Two things happen in this step:
- We use the
.csvgenerated in thescorestep to organize all of our images into subdirectories split by scores - We use the command-line arguments provided to
kneejerk transferto determine how we process/transform our images. - See On Image Dimensions to understand the motivations for these arguments
- We use the command-line arguments provided to
The arguments we can supply are as follows:
-f, the name of the.csvfile from the last step. Required.-c, --consider_size, whether or not we want the size of the image to be important. Choose from0/1, defaulted to0-r, --rescale_len, the height/width to resize each image to, defaulted to200--trainpct, the proportion of the original dataset to split into training data, defaulted to.7--testpct, the proportion of the original dataset to split into testing data, defaulted to.2--valpct, the proportion of the original dataset to split into cross-validation data, defaulted to.1- If not supplied, this will become
1 - trainpct - testpct
- If not supplied, this will become
A Couple Data Science Notes
- The
trainpct,testpct,valpctattributes should add up to1 - The underlying train/test/val function uses stratified sampling to maintain class balance. You will run into errors if the distribution of scores that you provide don’t allow
kneejerkto divide the images into neat subgroups by class
On Our Data
Your results will likely vary here, depending on how you initially scored the images and how the underlying train/test/validation splitter shuffles the data. But let’s run the following
kneejerk transfer -f example.csv --trainpct .7 --valpct .2 --testpct .1
It will think for a minute, then when it’s finished running, your directory should look like
kneejerk_example
 |
 |--- example.csv
 |
 |--- example
 |      |
 |      |-- metadata.json
 |      |-- test
 |      |    |
 |      |    |- 0
 |      |    |  | ...
 |      |    |- 1
 |      |       | ...
 |      |
 |      |-- train
 |      |    |- 0
 |      |    |  | ...
 |      |    |- 1
 |      |       | ...
 |      |
 |      |-- val
 |      |    |- 0
 |      |    |  | ...
 |      |    |- 1
 |      |       | ...
 |
 |--- images
 |      | ...
 |--- README.md
Few things to point out here:
- The directory name that houses all of your transformed/transferred corresponds to the name of your
.csv example/metadata.jsondrops aJSONobject containing all of the runtime conditions that build this structure, for versioning purposes- If
valpctwas0.0, the directory will still be made, but empty - All of the images dropped into the resulting directories will be of size
rescale_len X rescale_len
Loading
Finally, we’ve provided a simple template, loader.py to illustrate how cheaply you can get up and running with your new dataset, pasted below for ease of reading
from keras.preprocessing.image import ImageDataGenerator


TRAIN_DIR = 'example/train'
TEST_DIR = 'example/test'
VAL_DIR = 'example/val'

train_datagen = ImageDataGenerator(rescale=1./255)
validation_datagen = ImageDataGenerator(rescale=1./255)

train_generator = train_datagen.flow_from_directory(
        TRAIN_DIR,
        target_size=(200, 200),
        batch_size=2,
        class_mode='binary'
    )

validation_generator = validation_datagen.flow_from_directory(
        VAL_DIR,
        target_size=(200, 200),
        batch_size=2,
        class_mode='binary'
Running this will yield a printout informing you how your data got shuffled
$ python loader.py
Using TensorFlow backend.
Found 18 images belonging to 2 classes.
Found 6 images belonging to 2 classes.
From this point on, the data munging is all taken care of and the real fun starts!